Image Map
Showing posts with label food. Show all posts

Thursday, April 30, 2015

recipe | cinnamon shortbread cookies


I always love to have shortbread cookies with hot tea in a pretty little tea cup... I can pretend that I am in England and it's afternoon tea time! I usually like to just buy the Girl Scout shortbread cookies, but this year I decided to make my own! As it turns out, these homemade shortbread cookies taste much better the Girl Scout version. And they are so easy to make, with only 4 ingredients. The cinnamon was the perfect touch to compliment my favorite tea.


Recipe: Cinnamon Shortbread Cookies

Ingredients…
1½ cups Butter, softened
1 cup Powdered Sugar
1 teaspoon Cinnamon
3 cups All-purpose Flour

Directions…
 Preheat oven to 325 degrees.
In a large mixing bowl, beat butter until smooth. Slowly mix in the powdered sugar and cinnamon. Then, gradually mix in the flour, until well blended. Scrape down the sides of the bowl as you mix.

Sprinkle a clean counter top with flour and roll out the dough to be about ¼ inch thick. Use additional flour, as needed. Use a cookie cutter to create your desired shape or just cut the dough into squares. Place the cookies on to a cookie sheet, covered with parchment paper.

 Bake for 12-15 minutes or until they are just barely golden. Place cookies on a wire rack to cool.

Pour a cup of tea and enjoy!

Tuesday, March 17, 2015

recipe | mint brownies


I made these brownies for my Bible study group tonight! Obviously, because chocolate and mint are perfect together and I thought they would be fitting for today, since it is Saint Patrick's Day!
I did sneak a little taste before packing them up for tonight and they are amazing!


Recipe: Mint Brownies

To make the Brownies...
1/2 cup Butter (1 stick)

3/4 cup White Sugar
3/4 cup Brown Sugar
2 Eggs
1 teaspoon Vanilla
1 cup Flour
1/2 cup Cocoa Powder
1/2 teaspoon Salt
1 cup Andes Mints, chopped

Preheat oven to 375 degrees.
Line an 8×8″ baking pan with parchment paper. 
In a medium saucepan, melt butter over medium-low heat. Add both sugars and mix. Remove from heat. Add eggs and vanilla, mix thoroughly. Then, mix in the flour,cocoa and salt, until well combined. Fold in the chopped Andes Mints. Pour mixture into baking pan. Bake for 25 minutes.

To make the Mint Frosting...
6 tablespoons Butter, softened
2 tablespoons Milk
3-4 cups Powdered Sugar
1/2 teaspoon Peppermint Extract
Green Food Coloring

In a large mixing bowl, beat the butter and half of the powered sugar until fluffy. Mix in the milk and peppermint extract. Then, add a cup of powdered sugar at a time, until the frosting is the right consistency. Finally, mix in drops of green food coloring until it is the desired shade of green.

Frost the brownies once they are completely cool.
Sprinkle the top with even more chopped Andes Mints.

Enjoy!

Thursday, February 12, 2015

recipe | coconut cream truffles


I have a recipe to share for a little sweet treat, just in time for Valentine's Day! Any kind of truffle is always a good choice to make for those you love. Everyone is impressed when you give them a handmade truffle, and of course, these taste better than the store-bought boxes of candy.
If you have never made candy before, this is a simple recipe to try. Coating the truffles with the melted chocolate takes a bit of practice, but it is fun and if they look a little "rustic" it's okay!


Recipe: Coconut Cream Truffles

Ingredients…
3 cups coconut (sweetened, shredded)
1/2 cup powdered sugar
1/2 cup sweetened condensed milk
1/4 cup butter (melted)
1  bag Wilton Dark Chocolate Melts

Instructions…
In a large mixing bowl, combine coconut, powdered sugar, sweetened condensed milk and melted butter until it is well mixed. Use your hands to form 1-2 inch balls and place them on a parchment lined cookie sheet. Put the coconut balls in the freezer for at least 2 hours.
Once the coconut balls are ready…
Use a microwave safe bowl to gradually melt the Wilton Dark Chocolate wafers in the microwave, 45 seconds at a time, stirring in between each time. Once the chocolate is fully melted, use a fork to roll each coconut ball in the melted chocolate. Once the coconut ball is fully coated, remove it from the chocolate on the fork and tap fork on the edge of the bowl to shake off excess chocolate. Gently place each chocolate coated truffle back on the cookie sheet. I use a toothpick to help slide it off the fork without messing up the chocolate. Chill the truffles until the chocolate is completely set... And they are ready to eat!!!
It is best if the truffles are stored in the refrigerator.


Happy Valentine's Day!

Thursday, January 29, 2015

recipe | healthier banana muffins


These muffins are healthier than normal because there is no butter/oil in the recipe and the sugar
is reduced, adding applesauce (no sugar added), which adds natural sweetness and moisture.
They turned out so good... great flavor and texture. And I figured out the calories using
MyFitnessPal.com and each muffin comes in at 81 calories, which makes them even better! 
I will definitely be making this recipe often when I have ripe bananas in the kitchen.


Recipe: Healthier Banana Muffins

Ingredients…
2 ripe bananas, mashed
1/2 cup sugar
1 egg 
1/4 cup applesauce (no sugar added)
1 teaspoon vanilla extract
1 cup all-purpose flour
1 teaspoon cinnamon
1/2 tablespoon baking powder
1/2 teaspoon baking soda
1/2 teaspoon salt


Instructions…
Preheat oven to 350 degrees. 
In a large mixing bowl, combine mashed bananas, sugar, applesauce, egg and vanilla until it is well mixed. In a small bowl, combine all of the dry ingredients and mix into the banana mixture until all is evenly combined, do not over mix. Pour the batter into greased muffin tins, approximately 2/3 full. Sprinkle the tops of each muffin with a little bit of brown sugar and oats, if you’d like. Bake for 12-15 minutes, until a toothpick comes out clean.


... a perfect breakfast, with a cup of tea!!

Thursday, January 8, 2015

recipe | pumpkin cobbler cake


I meant to share this post around Thanksgiving/Christmas time, because it is an excellent and
easy dessert for the holidays. Unfortunately I got a bit behind on my blog... BUT it's never too
late to share a great pumpkin recipe. And I am sure I will make it again this winter, because
I love pumpkin desserts and this is a really good one!


Recipe: Pumpkin Cobbler Cake

INGREDIENTS...
1 can (15 oz.) pumpkin
1 can (10 oz.) evaporated milk
¾ cup brown sugar
3 eggs
1 teaspoon cinnamon
½ teaspoon ground cloves
½ teaspoon nutmeg
1 box yellow cake mix
2 sticks butter, melted
1 cup chopped pecans
½ cup toffee bits


DIRECTIONS...
Preheat oven to 350 degrees.
Grease the bottom and sides of a 9 x 13 inch cake pan.
In a large bowl combine the pumpkin puree, evaporated milk, sugar, eggs and spices.
Whisk until combined.
Pour the pumpkin mixture into your buttered pan.
Evenly spread the yellow cake mix over the top of the pumpkin.
Sprinkle the chopped pecans & toffee bits over the cake mix.
Drizzle the melted butter evenly over the top.
Bake for 45-50 minutes, until the center is set. 
Chill before serving and top with whipped cream… so yummy! 

Wednesday, October 15, 2014

recipe | pumpkin spice frosted cookies


Pumpkin Spice Cookies

1 stick butter, softened
½ cup coconut oil
1 cups granulated sugar
1 teaspoons baking powder
1 teaspoons baking soda
½ teaspoon salt
1 teaspoon ground cinnamon
½ teaspoon ground nutmeg
½ teaspoon all spice
2 eggs
1 teaspoons vanilla
8 ounces pumpkin puree
2 cups all-purpose flour

Preheat oven to 350 degrees.
In a large mixing bowl, beat butter and coconut oil until well mixed and creamy. Add granulated sugar, baking powder, baking soda, salt, cinnamon, nutmeg and all spice. Beat until combined. Beat in the eggs and 2 teaspoons of vanilla until combined. Beat in the pumpkin puree. Gradually mix in the flour until all is well combined.
Drop a spoonful of dough two inches apart on to a cookie sheet.
Bake for 10  minutes. Move cookies to a wire racks to cool completely.

Cinnamon Sugar Cream Cheese Frosting

6 ounces cream cheese, softened
½ stick butter, softened
¼ cup light brown sugar
¾ teaspoon cinnamon
½ teaspoon vanilla
1-2 Tablespoons milk
2-4 cups powdered sugar

Mix softened cream cheese and butter until it is smooth and creamy. Mix in the brown sugar and
cinnamon. Mix in the vanilla and milk. Finally, gradually add in the powdered
sugar one cup at a time, until it is the proper consistency.


The frosting goes so perfectly on these cookies. They are amazing!

I am so happy it is time for fall baking!

Tuesday, September 2, 2014

recipe | peach crisp

My favorite thing about the end of the summer is fresh peaches!! They are my most favorite fruit. Of course, I love peach crisp (hence this recipe) but I can honestly say that a plain peach is just as good. Either way I can not get enough of them 
right now. Another thing that has been interesting to me lately is coconut oil... I have been more curious about it since I made homemade chocolate shell with it. So, I was excited to try it in this recipe for peach crisp topping. I am not too sure 
of the health pros & cons of using coconut oil, but I do know it made this topping taste pretty great!

Peach Crisp

Ingredients for the peach mixture...
5 peaches, chopped 
1/4 cup sugar
1 teaspoon cinnamon
1 Tablespoon flour

Ingredients for the crisp topping...
1/2 cup flour
1/2 cup brown sugar
1/2 cup oats
1/4 teaspoon sea salt
teaspoon cinnamon
5 Tablespoons coconut oil

Directions...
Preheat oven to 350º
In a large bowl, gently mix the chopped peaches, sugar, cinnamon and flour. 
Pour the peach mixture in an 8x8 or 9x9 dish and set aside. 
Combine all of the topping ingredients in a small bowl and mix with a fork until crumbly. 
Sprinkle the crumb topping evenly over all the peaches. 
Bake for 50 minutes. Double this recipe for a 9x13 baking dish. 


Saturday, July 26, 2014

recipe | homemade chocolate shell

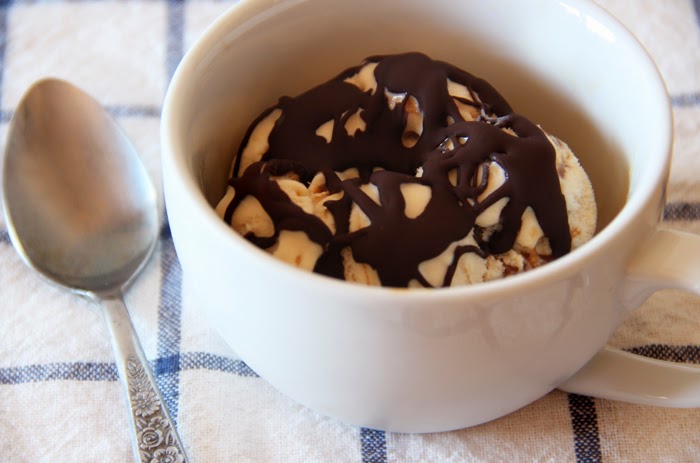
I have always loved "Magic Shell" on ice cream. It is chocolaty and yummy, and I love the way it hardens on ice cream. When I was a kid I went through a phase of loving it so much that my grandma actually gave me a bottle for my birthday as a "joke gift" (kind of)... I took it seriously though and wouldn't let anyone else in my family have any. So, needless to say, I was pretty excited to find a recipe on Pinterest for for homemade chocolate shell!!!! And I will say, this is definitely the easiest recipe I have ever posted, which is awesome, but may not be such a good thing...

Homemade Chocolate Shell

Ingredients...
1 cup chocolate chips 
(I used Hersey's Special Dark chips)
2 tbsp pure coconut oil

Directions...
Put the chocolate chips and the coconut oil in a small microwave safe dish.
Microwave for 60 seconds, until it is all melted and stir until smooth. 
And that's it!
Now, just drizzle it over your ice cream and allow it to harden before eating.

Store left over chocolate shell in a microwave safe airtight container. The magic shell will thicken up when it sits, but just reheat it in the microwave for 30-60 seconds when you're ready to serve again.

Easy and Sooo good!!!


Thursday, May 22, 2014

recipe | focaccia bread

I love baking bread!!! And this basic Focaccia recipe is my new favorite!! It is very simple to make (with a KitchenAid mixer) and the taste/texture is amazing! For some reason I really like to eat it with Cheddar Broccoli & Ham soup. 
I topped my Focaccia simply with coarse sea salt and a little bit of basil. But I have seen many with different "toppings" 
like rosemary, garlic, tomatoes, olives, caramelized onions, etc... So this is a great basic recipe that could be flavored
in a variety of ways. Also, I know this dough would make a really good pizza crust!

Recipe : Basic Focaccia Bread

Ingredients...
1 3/4 cups warm water
1 tablespoon sugar
1 package active dry yeast
5 cups all-purpose flour + additional for kneading
1/2 cup extra-virgin olive oil + additional for bowl and pan
1 tablespoon salt + coarse sea salt for sprinkling on top

Directions...
Combine warm water, yeast and sugar in a mixing bowl fitted for a KitchenAid mixer. Set bowl aside for 10-15 minutes to allow the yeast to start dissolving.

Attach the dough hook to your KitchenAid mixer. Add the flour, salt and olive oil to the bowl with the yeast mixture. Begin the mixer on low speed until the dough comes together. Then turn the mixer to medium speed and continue to knead the dough in the mixer for 5 minutes, until it is smooth.

Transfer the dough to a clean, lightly floured surface and knead it by hand a few times. If the dough is still sticky give it a little bit more flour.

Brush the inside of a large bowl with olive oil and place the dough in the bowl. Cover it with plastic wrap and allow the dough to raise for at least 1 hour.

Brush a 9x13 pan generously with olive oil. Put the dough in the pan and press it out to the edges and corners of the pan. Then, use your fingers to make several indentations all over the top of the dough, which will give it the uneven texture that is characteristic of Focaccia. Brush the top with a little bit more olive oil and sprinkle with coarse sea salt & the herbs or "toppings" of your choice.

Allow the dough to raise again, for about 30 minutes. Preheat the oven to 425 degrees. Bake for 25 to 30 minutes, until the top is golden brown. Allow Focaccia Bread to cool before cutting and serving.


It looks so yummy!!

Saturday, April 26, 2014

recipe | hash brown crust quiche


This has become one of my favorite new breakfast-for-dinner recipes! Hash browns are a favorite breakfast food for most people and this is such a great way to use them! Plus, it is so much easier than a typical crust.

Hash Brown Crust Quiche

Ingredients...
2-3 cups Frozen Hash Browns (mostly thawed out)
2 Tablespoons Olive Oil (for brushing pie dish & hash browns)
5 eggs 
1/2 cup milk
1/2 pound Ground Turkey Sausage, fully cooked (or other breakfast meat)
Chopped Veggies, such as onions, green peppers, mushrooms, tomatoes, spinach, etc…
Salt & Pepper, as desired
2/3 cup Shredded Cheese (to sprinkle on top)

Directions...
Preheat oven to 425 degrees. Brush a glass pie dish with olive oil. Press hash browns into the pie dish and tightly press them all around the bottom & sides. Lightly brush the packed hash browns with olive oil. Bake in a 425 degree oven for 20 minutes or until the hash browns are slightly browned & crispy around the edges.

While the hash brown crust is baking, whisk eggs & milk well, in a large bowl. Then, add in your desired ingredients... I like to use ground turkey sausage (fully cooked), onions, green peppers, mushrooms and feta cheese (you could also use ham, spinach, tomatoes, etc…) Add salt & pepper, as desired. Mix well & set aside until the hash brown crust is done baking.

Once you remove the hash brown crust from the oven, reduce the oven's temperature to 350 degrees. Then pour the egg mixture over the crust. Cover the top with shredded cheese. Return quiche to the oven for 30 minutes or until it is cooked through (the egg should be firm in the middle).

Doesn't the hash brown crust look good???

Thursday, February 13, 2014

recipe | lemon shortbread cookies

Just because everyone loves pink heart-shaped cookies for Valentine's Day!

Lemon Shortbread Cookies

Ingredients...
2 sticks butter, softened
1/2 cup sugar
3/4 teaspoon salt
zest from one lemon
pinch ground ginger
2 cups all-purpose flour
Directions...
Cream butter and sugar together until fluffy. Mix in the salt, ginger, and lemon zest.Gradually add in the flour and mix until combined. Wrap the dough in plastic wrap and refrigerate for 20 minutes.
Preheat oven to 325 degrees.
Roll out the dough 1/4 inch thick and cut into shapes.
Place on a cookie sheet about an inch apart and bake for 9-10 minutes
Allow cookies to cool completely while you make the lemon icing.

For the "lemon" icing...
juice from one lemon
1 cup powdered sugar
(I added one drop of red food coloring to make them pink for Valentine's day!)

To make the icing, whisk together the above ingredients. If the consistency is too thin add more powdered sugar. If it is too thick add more lemon juice or water, a little bit at a time, until it is the right consistency. Once the cookies have cooled completely, drizzle the icing all over the cookies and allow the icing to set up.

Tuesday, February 4, 2014

recipe | soft pretzel bites

 I made these pretzel bites for a little Super Bowl party that my family had. The game was quite depressing 
for us Bronco fans, but we still enjoyed the time together and, of course, the yummy food!!

Soft Pretzel Bites

 Ingredients
1 1/2 cups warm water
1 tablespoon sugar
2 teaspoons salt
1 package active dry yeast
4 1/2 cups all-purpose flour 
4 tablespoons butter, melted
10 cups water
2/3 cup baking soda
Coarse sea salt


Instructions...
In the bowl of a standing mixer, combine warm water, sugar and kosher salt. 
Sprinkle yeast on top and allow it to sit for 5 minutes. 
Add in the flour and melted butter. Mix until well combined. 
Use the dough hook attachment to knead the dough until it is smooth, for about 5 minutes. 
Remove the dough, knead it by hand a few times and form it into an ball. 
Place the dough in an bowl brushed with vegetable oil. 
Cover and allow it to sit in a warm place for an hour or until the dough has doubled in size.

Preheat the oven to 450 degrees.
In an 8 quart pan, combine 10 cups of water with 2/3 cup of baking soda and bring to a boil.
 Cover a cookie sheet with a piece of parchment paper and lightly brush it with vegetable oil.

In the meantime, turn the dough out onto a clean counter top and divide it into 4 even pieces. 
Roll each piece of dough into a long rope and cut it into several 1 inch pieces.

Place 4 to 6 pretzel bites into the boiling water at a time. Leave them in the boiling water for 30 seconds. Remove them from the boiling water using a strainer spoon and place them on the cookie sheet. 
Sprinkle each pretzel with coarse sea salt. Bake for 10 to 12 minutes or until they are a dark golden color.
Serve Soft Pretzel Bites warm, brushed with melted butter or dip them in hot cheese sauce.
(These Soft Pretzel Bites are best served fresh, the same day they are made.)


Wednesday, July 31, 2013

recipe: peach coffee cake

If I had to pick a favorite fruit, peaches would probably be it! Of course, fresh peaches are one of my favorite things about summer time! After getting a box of Colorado peaches, from the farmer's market, I wanted to try something new with some of them and I decided on coffee cake... I couldn't be happier with how this turned out! 
This is the perfect breakfast or dessert!! :)

Peach Coffee Cake

Ingredients…
1 cup all-purpose flour
½ cup sugar
2 teaspoons baking powder
½ teaspoon salt
1 egg
½ cup milk
2 tablespoons butter, melted
1½ cups peaches, cut into small chunks

For the topping…
½ cup all-purpose flour
½ cup brown sugar
¼ cup cold butter
¼ cup chopped almond slices (or other nuts)

Directions...
In a bowl, combine flour, sugar, baking powder and salt. In a mixing bowl, beat egg, milk and melted butter. Stir in the dry ingredients just until moistened. Gently stir in the peaches. Pour batter into a greased and floured cast-iron skillet or an 8-inch square baking dish.

For topping, combine flour and sugar in a bowl; cut in butter until crumbly. Work the ingredients with a fork or your fingers until it is combined and crumbly. Stir in almonds (or other nuts) if you’d like; and sprinkle the topping evenly on the batter.

Bake at 375 degrees for 30-35 minutes or until a toothpick comes out clean.

Wednesday, July 24, 2013

recipe: strawberry fluff

This is a favorite recipe that I have been meaning to share for a while. It is super easy & so good, especially if you love strawberries! It is a cool & lite dessert that is so perfect for hot summer days!!

Strawberry Fluff

Ingredients
1 pack Strawberry Jello
1 pack Instant Vanilla Pudding
1 1/2 cups Cold Water
2 quarts Strawberries
1 large tub of Lite Cool Whip

Directions
Combine the strawberry jello & the vanilla pudding in a medium sauce pan. Whisk in the water. 
On the stove top, bring this mixture to a boil & allow it to boil for 4 minutes.
Take off the heat, place a lid on the pan & allow the mixture to cool completely, stirring occasionally.
Cut strawberries into bite-sized pieces and set aside.
Once the jello mixture is completely cooled, pour it into a large bowl (with a lid).
Stir in the strawberries. Then gently fold in the Cool Whip, until it is all combined.
Put the lid on the bowl and place it in the refrigerator for at least a few hours before serving.
This is must be served chilled, so keep it refrigerated.


Monday, June 24, 2013

recipe: spinach & feta puffs

Spinach and Feta paired together in a flaky pastry is amazing!
These are so good for appetizers and for brunch. 
And the recipe is easy, because you use store-bought puff pastry.
Yumm... I love these!! 

Recipe: Spinach & Feta Puffs

Ingredients...
2/3 cup fresh spinach
1/2 cup crumbled feta
1/4 cup minced onion
1 tablespoon olive oil
1 teaspoon minced garlic
Salt & Pepper, to taste
1 large egg
1 sheet puff pastry rolled out flat (keep chilled until its time to use)

Directions...
Preheat oven to 400°.
Spray muffin tin liberally with non-stick spray.

Put 3 good handfuls of fresh spinach into a food processor and pulse until it is finely chopped. You should have 2/3 cup of finely chopped spinach. In a medium bowl, mix the spinach with the feta, onion, olive oil, and garlic. Season with salt and pepper, to taste. In a small bowl, beat 1 egg and then fold it into the spinach mixture. Set aside.

Roll out the puff pastry so that it is even and flat. Using a pizza cutter, cut the puff pastry into squares that are just big enough to fill the muffin cups and for the corners to be folded over the filling. (I used a 24-cup mini-muffin tin, because I like these as an appetizer size! However, you could use the standard muffin size if you’d like.) Once you are done cutting the squares, place one in each muffin cup and press it in into bottom, leaving corners out. Then, fill each cup with the spinach/feta mixture. Finally, fold the puff pastry over filling, pinching the corners together in the center.

Brush the tops of the puff pastry with egg wash and bake until the pastry is golden brown and puffed, about 20-25 minutes. Allow the puffs to cool in pan for about 10 minutes. Run a sharp paring knife around pan edges to loosen; turn out puffs onto rack to cool slightly before serving.